افزایش سرعت
How can I enable virtualization (VT) on my PC?
https://youtu.be/ZDeje9wgDp4
Purpose
This article will help you in enabling virtualization in your PC/Laptop.
Benefits
Users who are facing issues due to virtualization not being enabled can now enable virtualization by performing the steps outlined below.
Audience
All users.
BlueStacks Versions and Geo's affected.
All versions of BlueStacks and all Geo's.
You can navigate throughout the article by clicking on your current Windows version below.
- If you're on Windows 7, click here.
- If you're on Windows 8, click here.
- If you're on Windows 8.1, click here.
- If you're on Windows 10, click here.
P.S - Before you go any further, a quick check might be the solution to enabling virtualization which would save you from having to perform the steps outlined below.
Step 1 - Open Task Manager by pressing the Ctrl+Shift+Esc key together at the same time and go to the "Performance" tab. On the bottom right, you will come across "Virtualization". Next to that, it will show either "Enabled" or "Disabled".
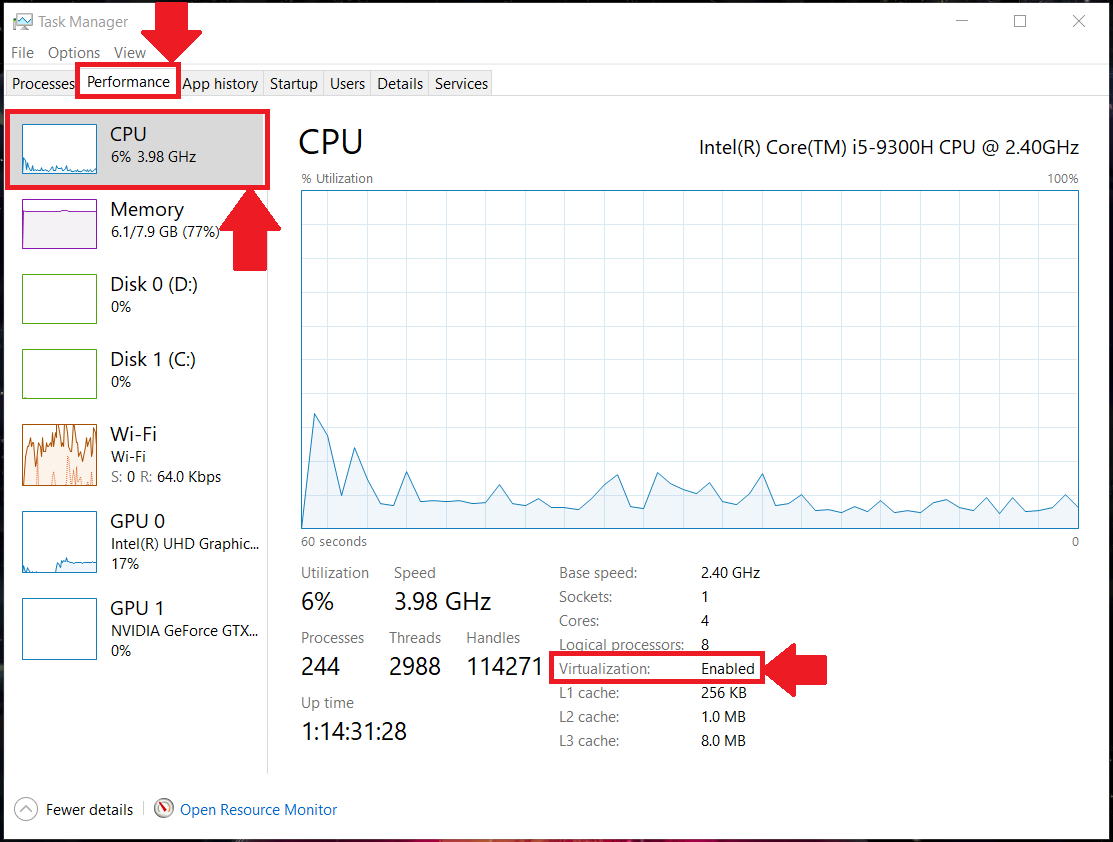
If virtualization is disabled, please proceed and perform the steps mentioned below.
To save you the trouble of scrolling, as this is a long article, we have attached a few helpful links to make it easier for you to navigate according to your requirements.
a) For Intel users :
b) For AMD users:
How can I find out if my PC supports virtualization
Download and run the free utilities provided by your PC's CPU manufacturer.
If your processor is made by Intel, the Intel Processor Identification Utility, see a), detects whether your PC supports virtualization (VT-x technology), See b) for AMD processors (AMD-V technology)
a) Intel users.
- Download Intel's virtualization technology detection tool from this link.
- Run the downloaded file.
- Upon commencement of installation, you will be prompted to select the language. Choose your preferred language. An example is shown below.
- Once the application is installed, open the program upon which you will see your CPU specifications as shown below. To find out if virtualization is enabled, click on "CPU Technologies".
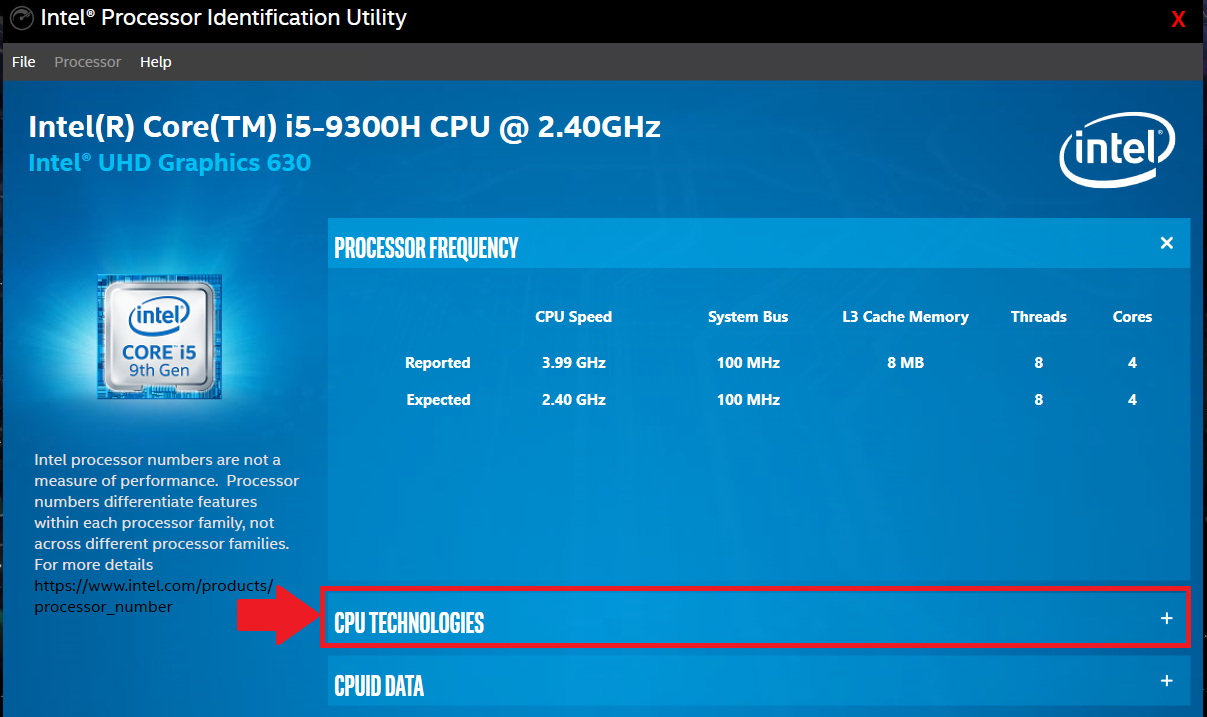
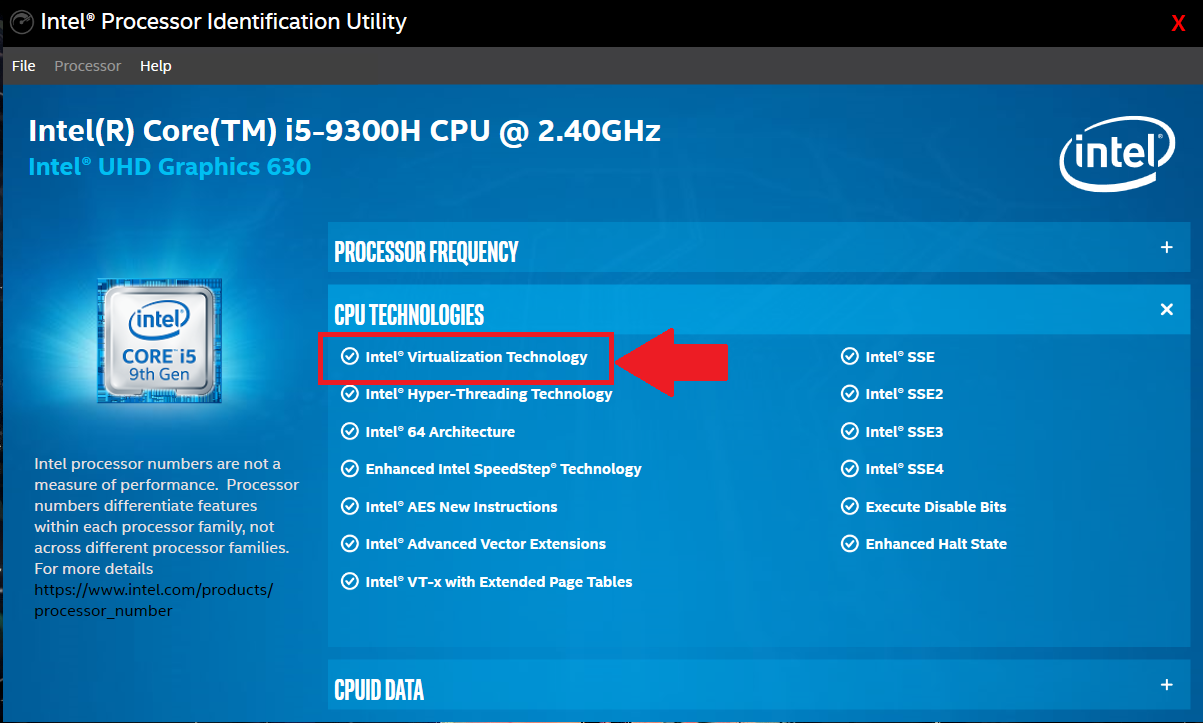
- A drop-down menu will appear wherein the information related to Virtualization could be seen. For reference, it is highlighted in the image below. A tick before "Intel® Virtualization Technology" will signify that virtualization is available on your machine.
b) For AMD Users -
Download AMD V Detection Utility. Once downloaded, right-click on the application file ( .exe ) and choose "Run as administrator". After running the application, it will show you the current state of virtualization on your processor.
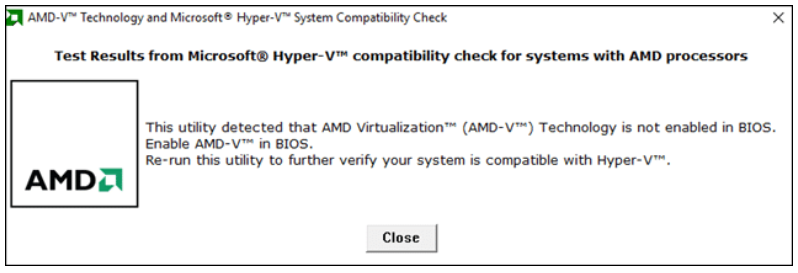
As shown, Virtualization is available on the system, however it is not yet enabled. We can enable it by going into BIOS Settings which will be shown later in the article.
How to enable virtualization if it is disabled.
One of the ways to access BIOS Settings throughout different Windows versions (this includes Windows 8/8.1 and 10) is through the simplistic "Settings menu". Accessing BIOS differs according to the version of Windows you are on. You can select the version you are currently on by clicking on the links below.
- If you're on Windows 8, click here.
- If you're on Windows 8.1, click here.
- If you're on Windows 10, click here.
If you have already entered your BIOS, please refer to the below links to go to the steps required for enabling virtualization in your PC/Laptop based on the type of processor you have.
Windows 8
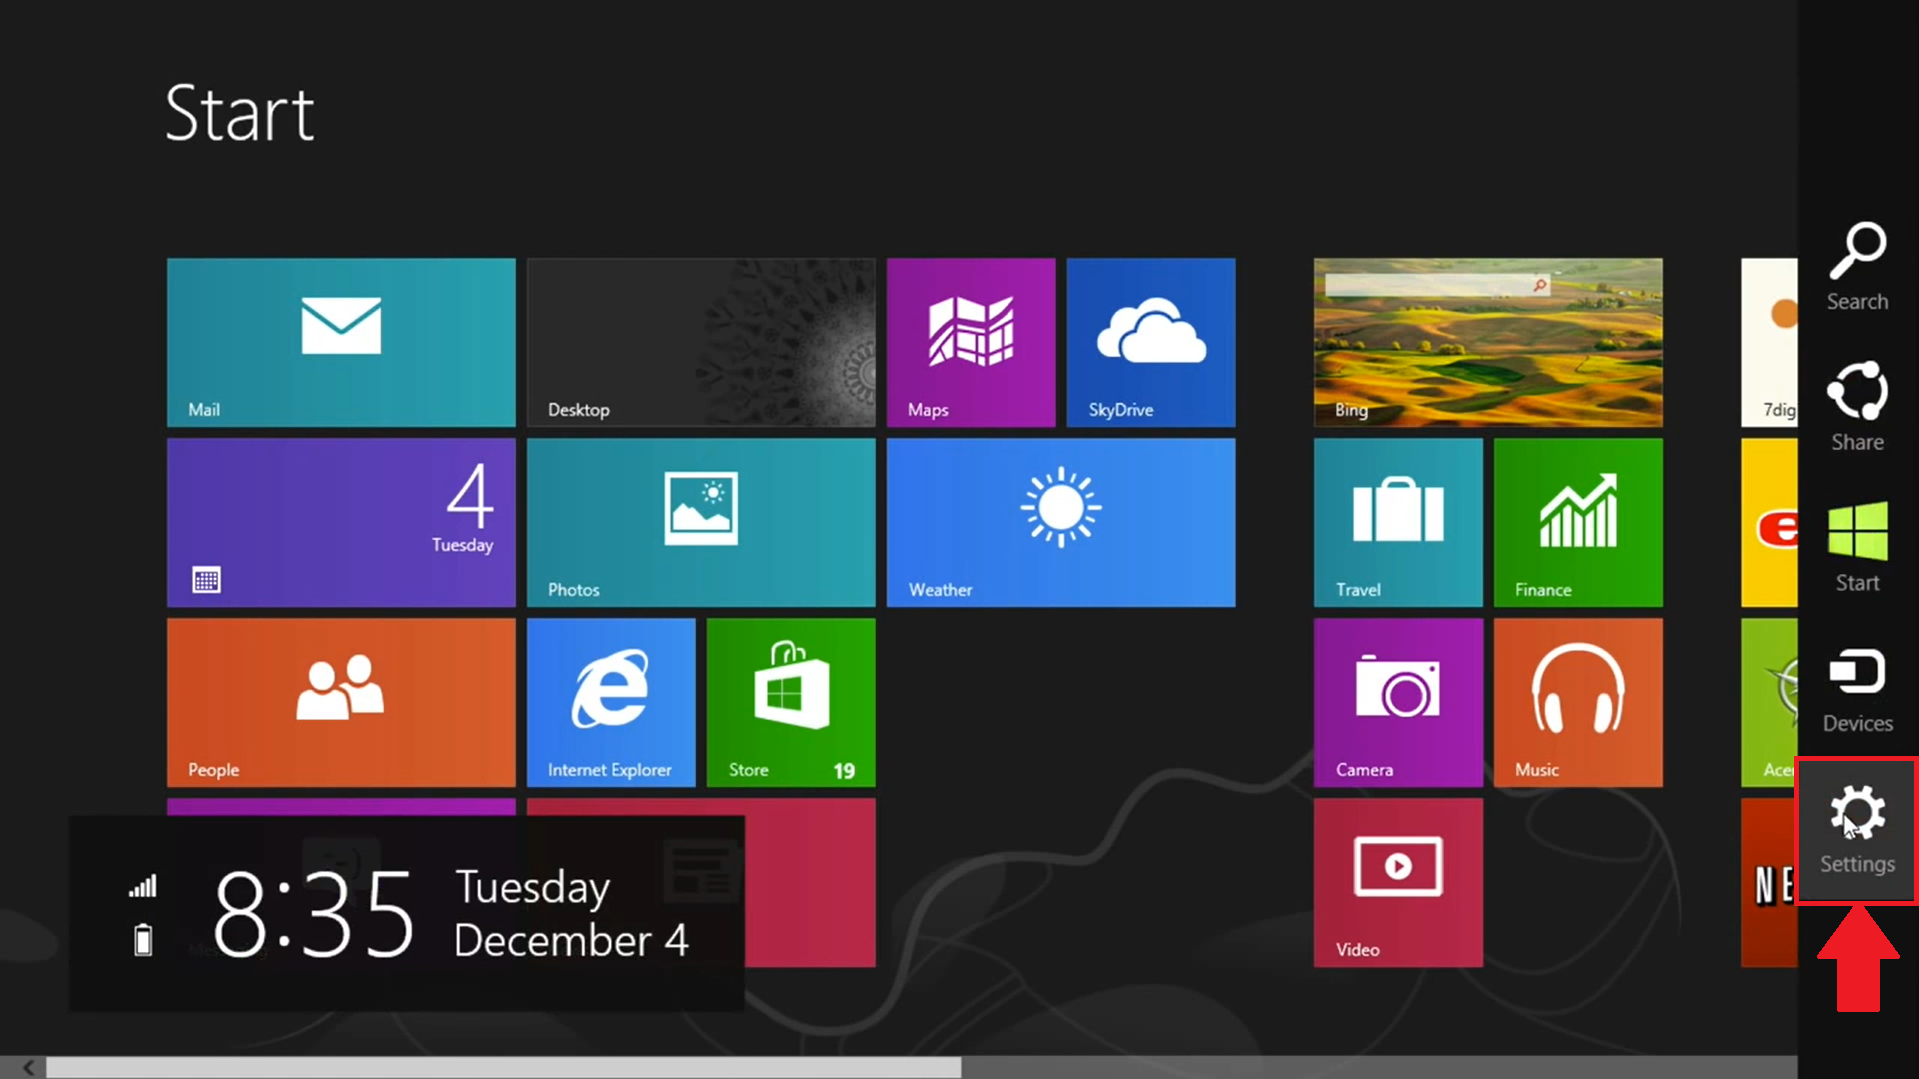
- Drag your mouse cursor to the bottom right and a sidebar should appear as shown below. Click on "Settings".
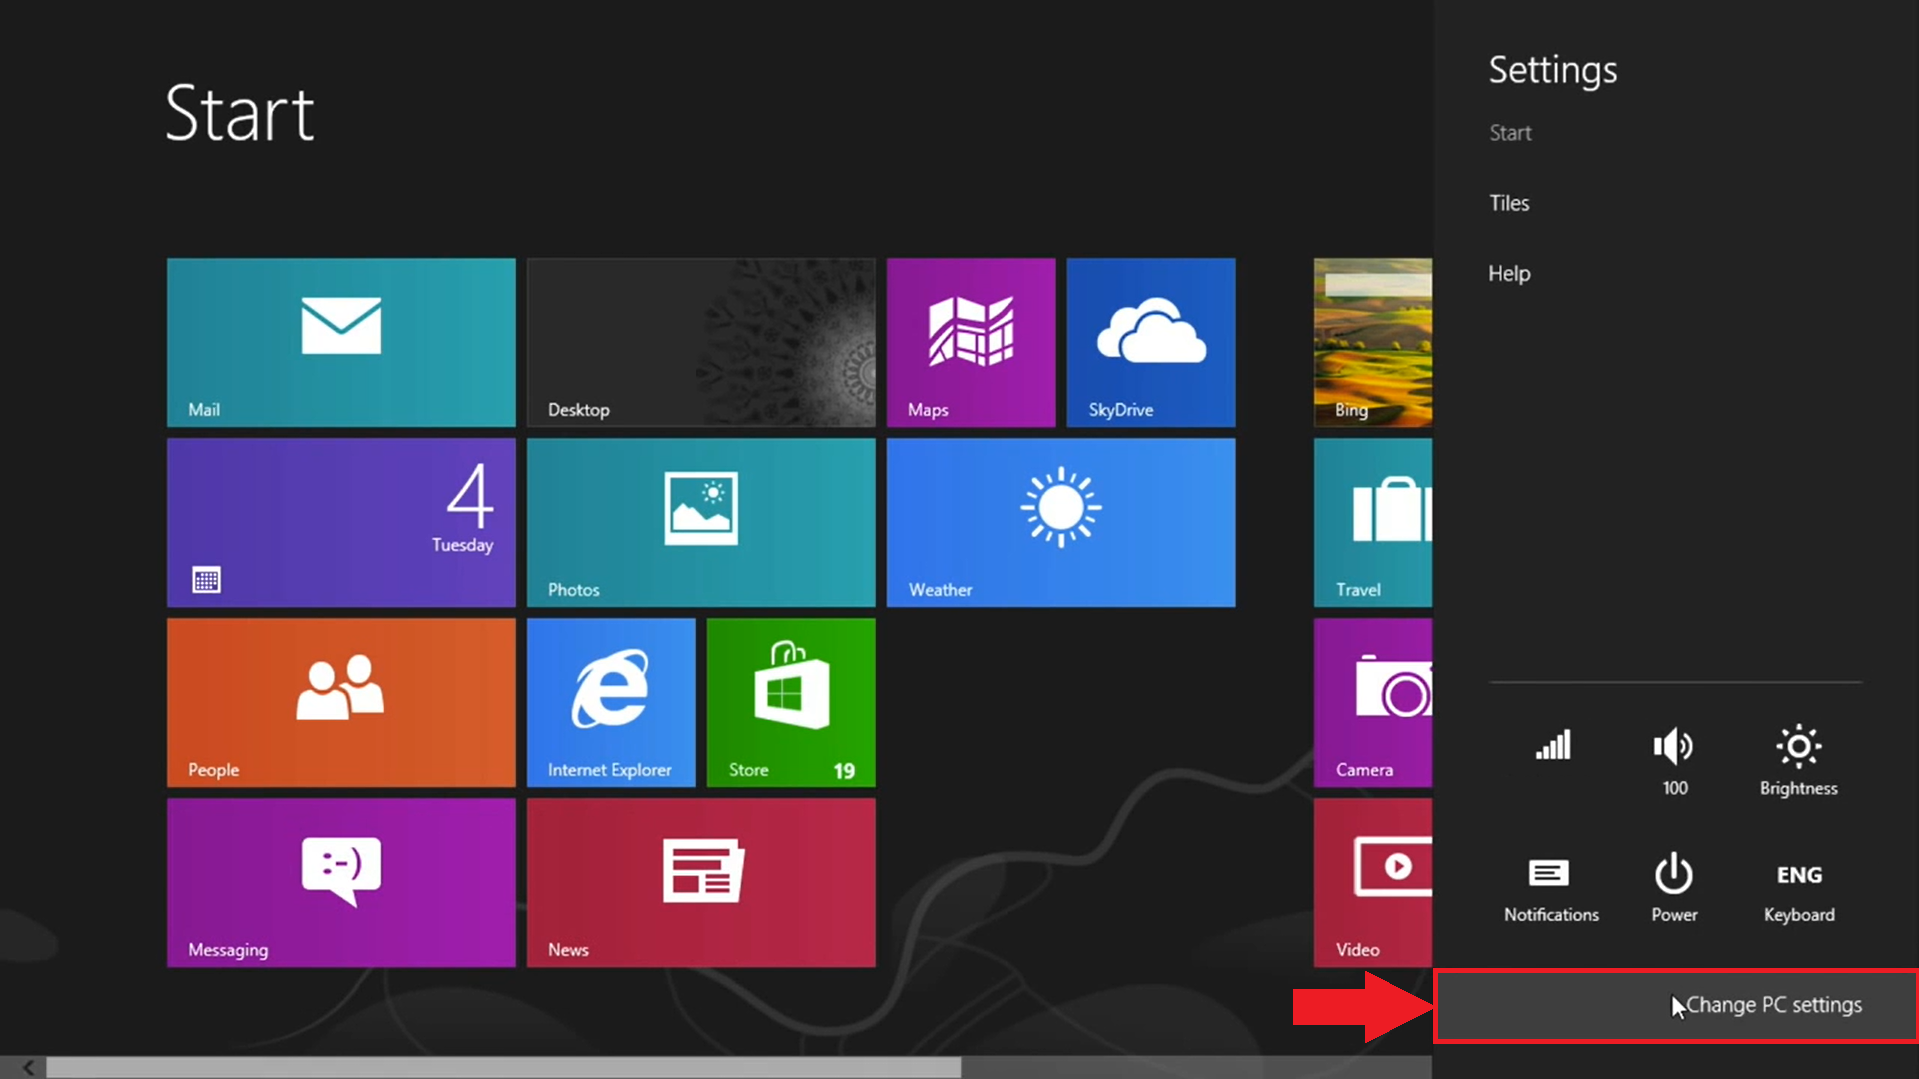
- You should then see a different sidebar, at the bottom of which will be "Change PC Settings". Click on that.
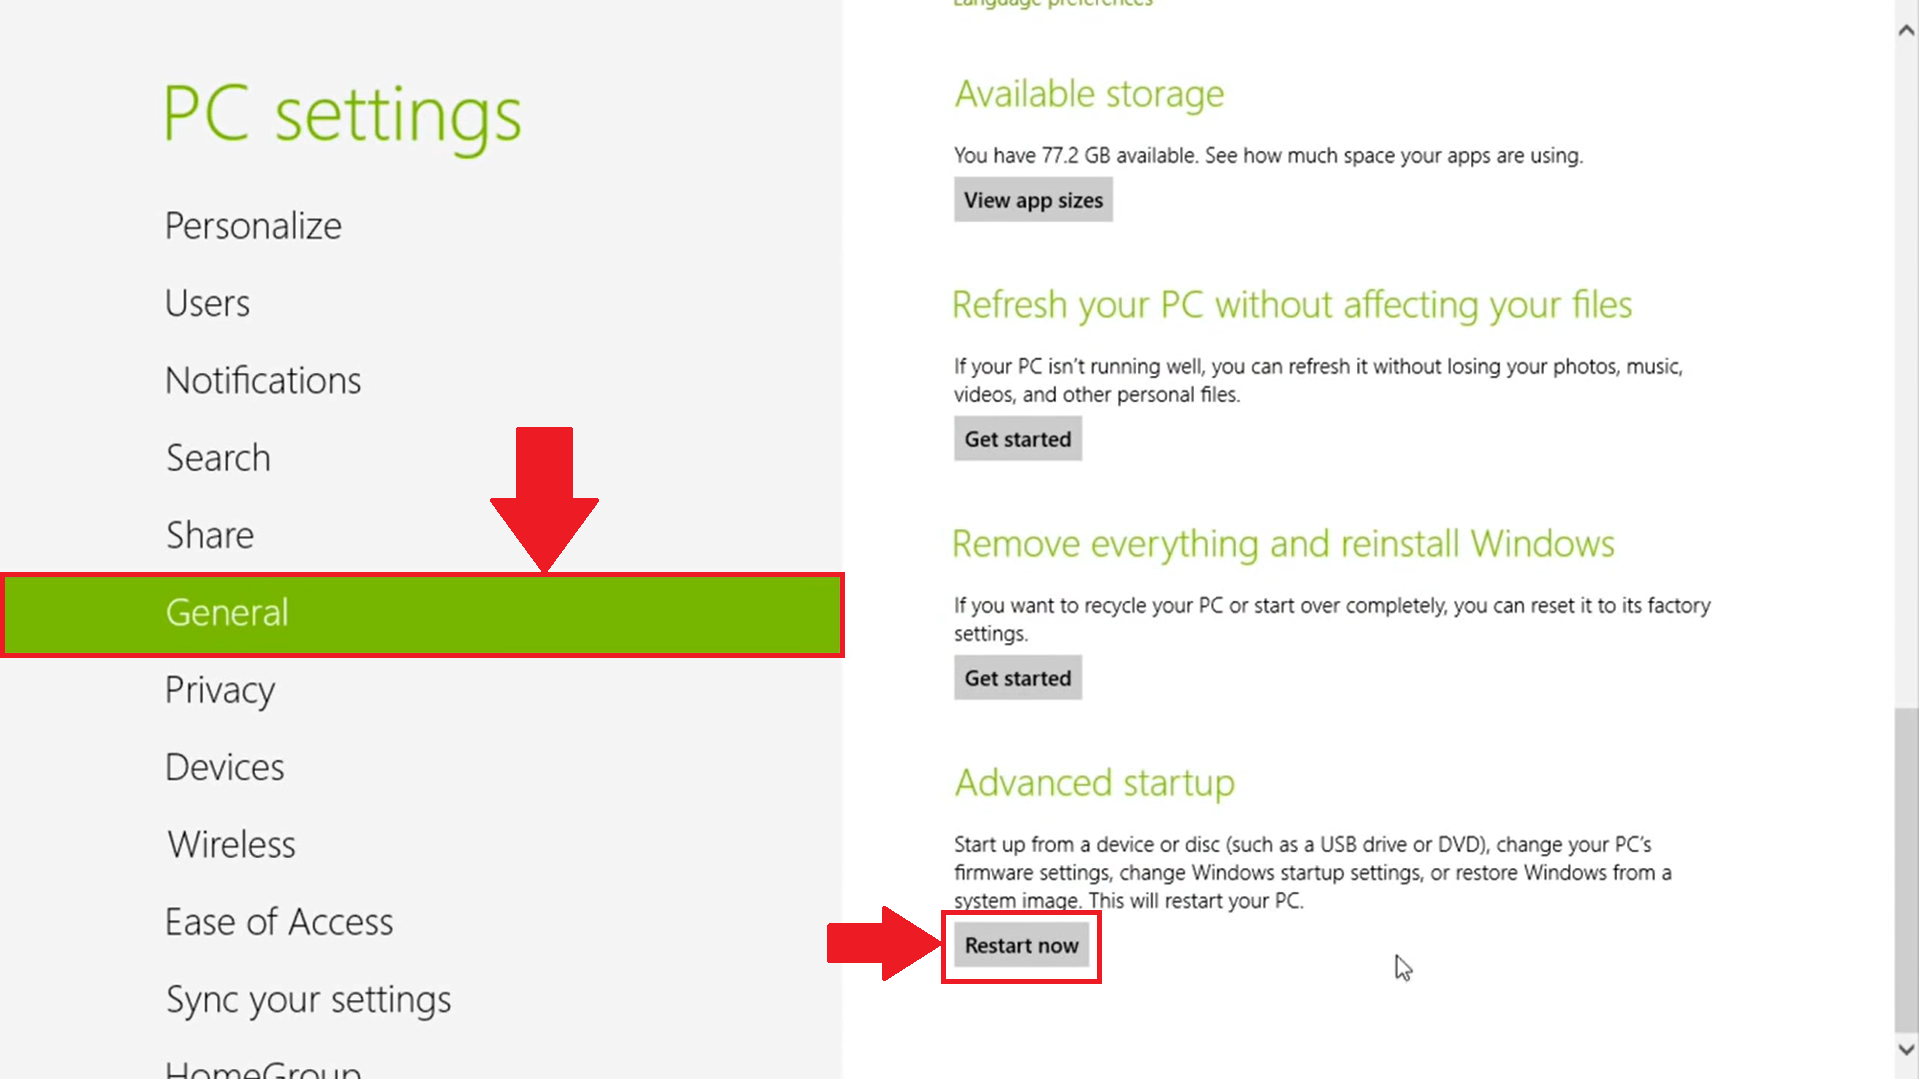
- After this, you will be shown the full settings menu. Click on "General" on the left side of the menu then scroll down on the right side and you should come across "Advanced Startup". Under that, click on "Restart now" as shown below.
For the next steps, click here.
Windows 8.1
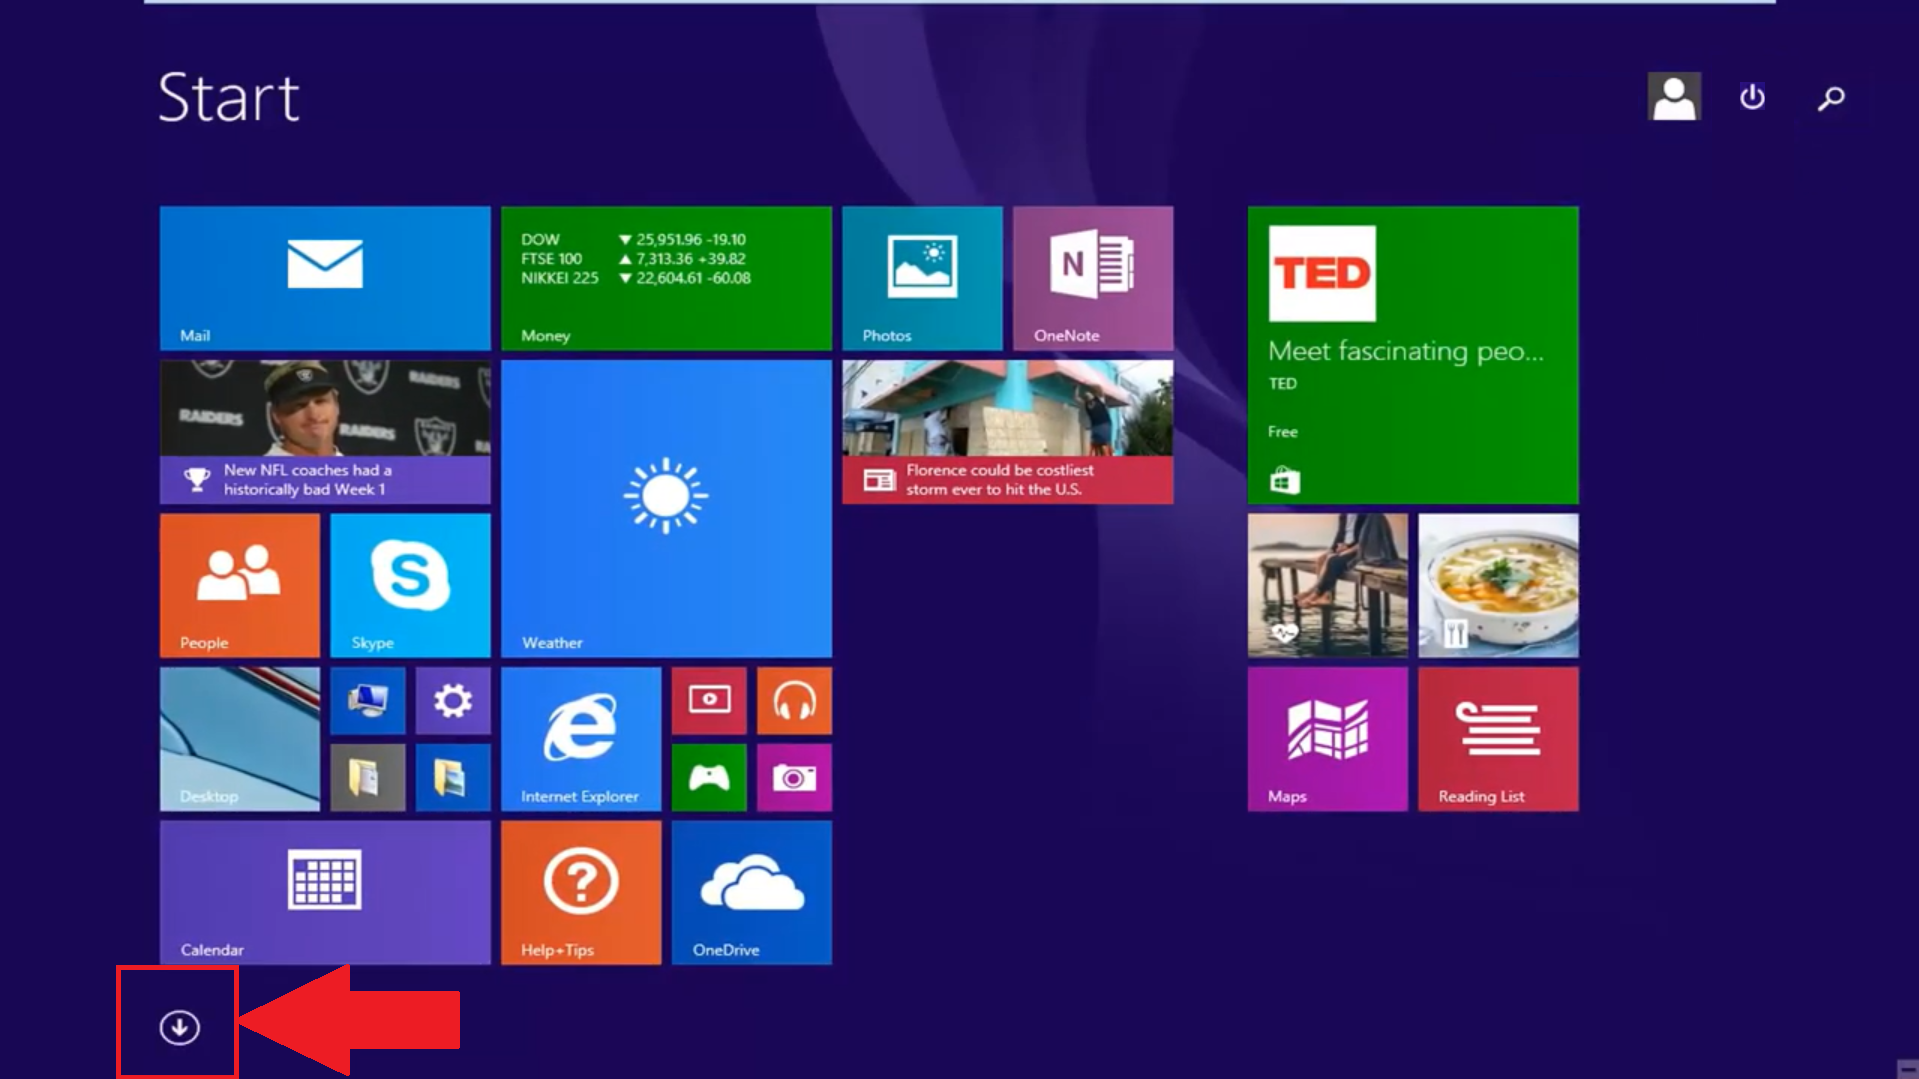
- On the Start menu, on the bottom left there will be an arrow as shown below. Click on that.
- You will then see a search bar on the top right which is illustrated below. Click on that.
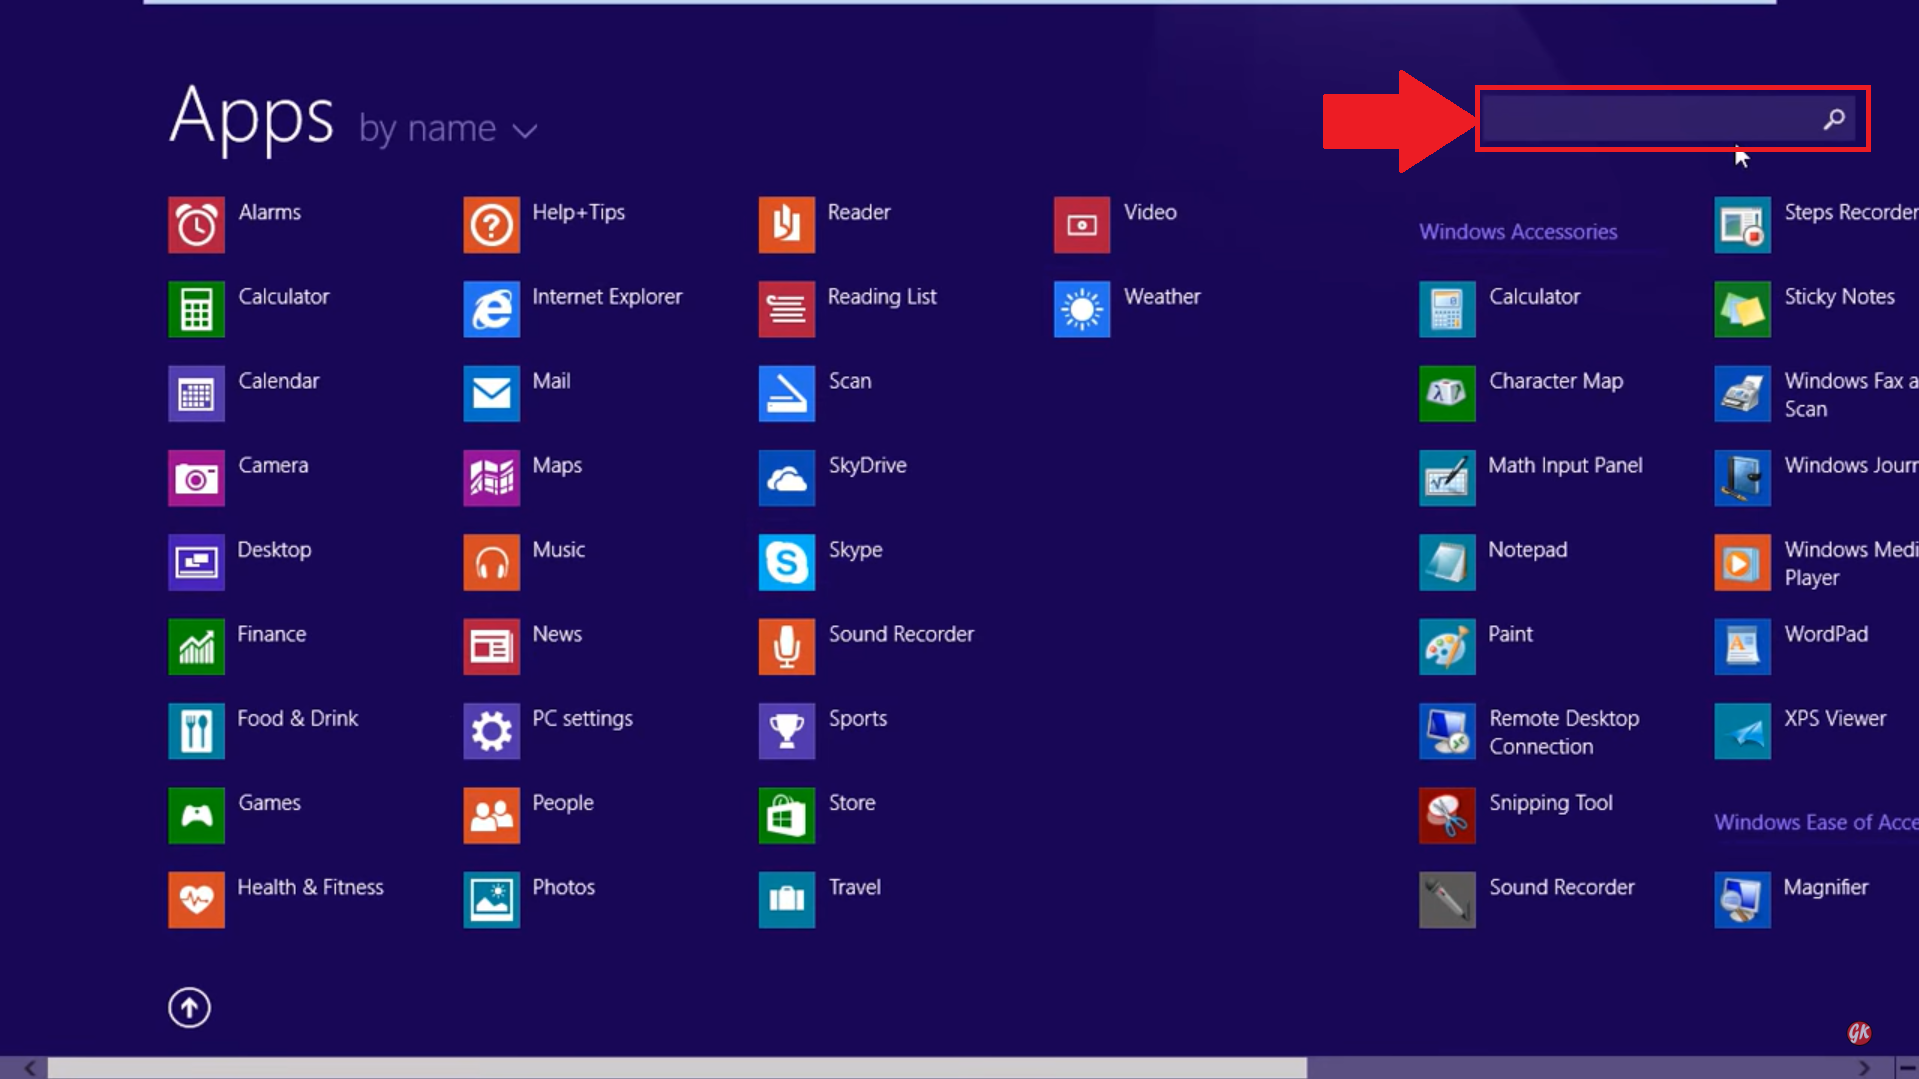
- Next, type in "Settings" in the search bar. Then, select the "PC Settings" option which will be shown.

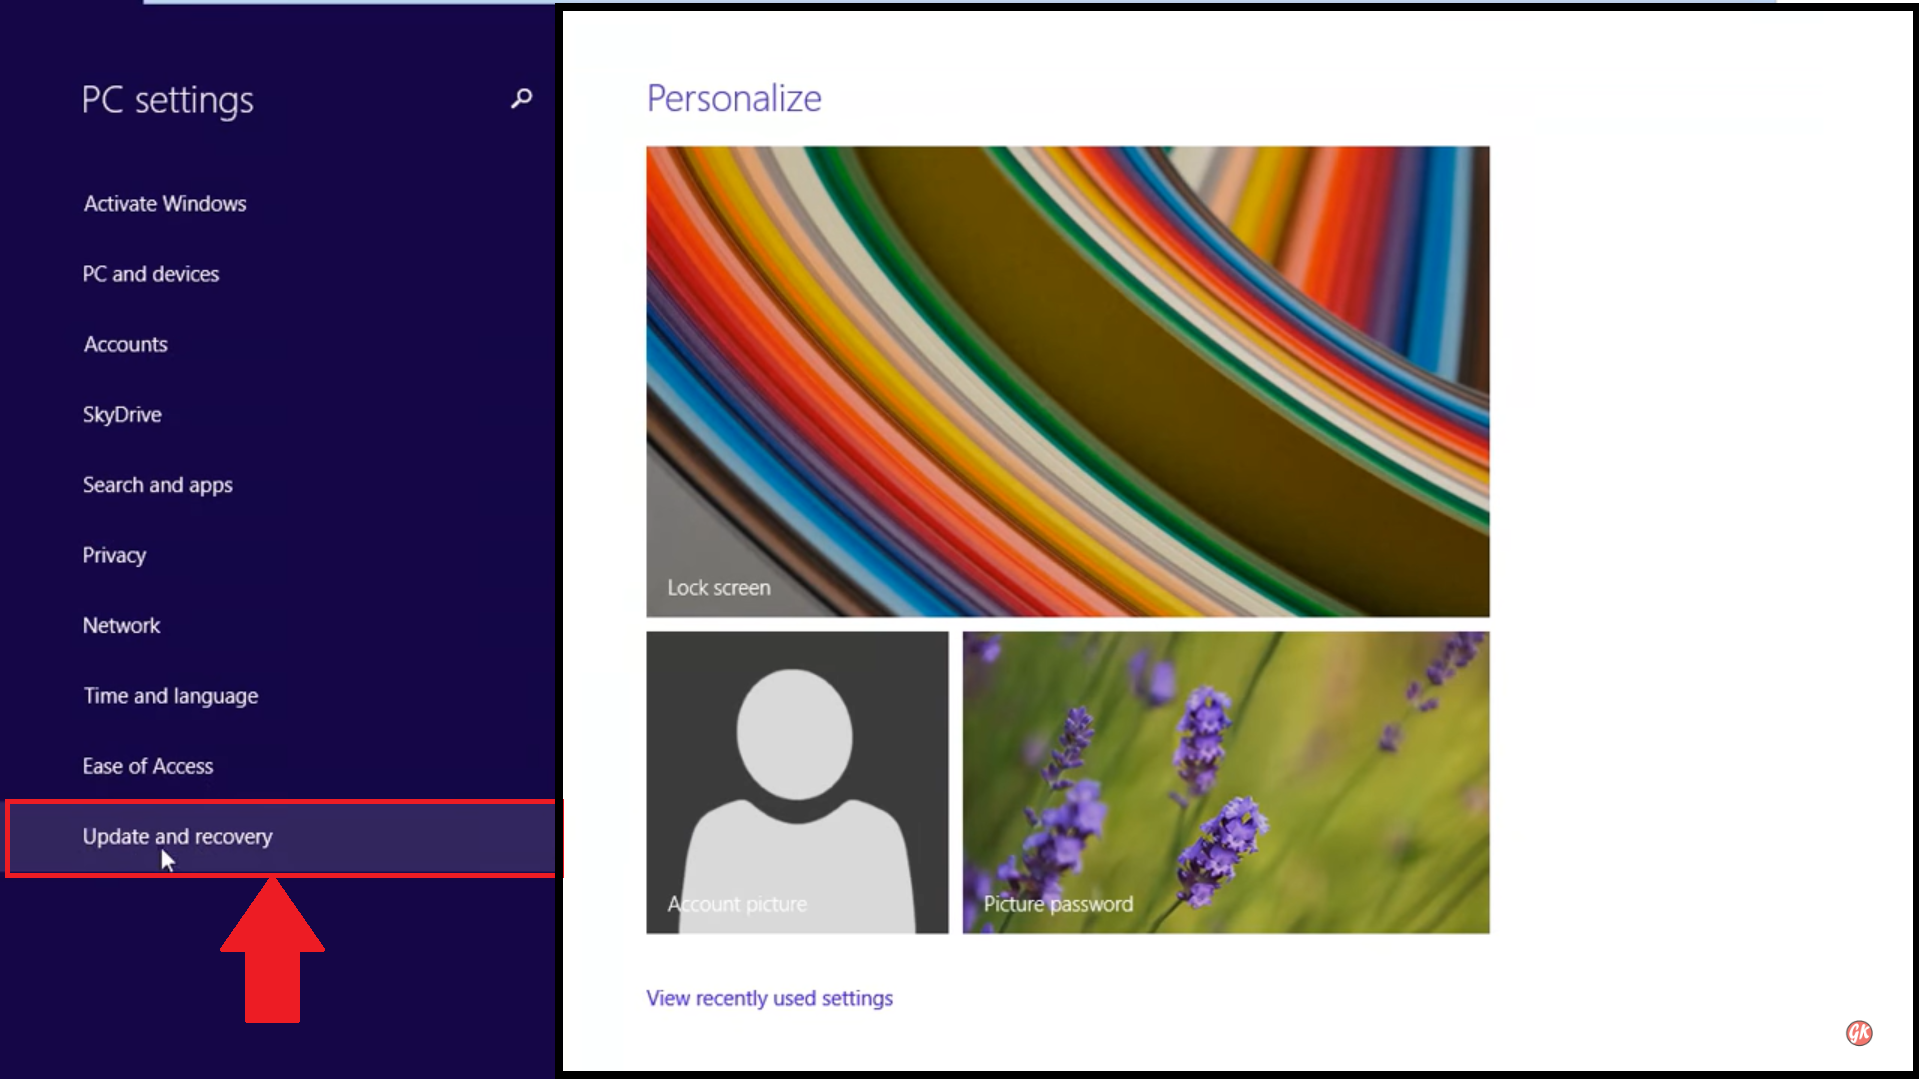
- You will then be shown the full Settings menu. On the left side, click on "Update & Recovery".
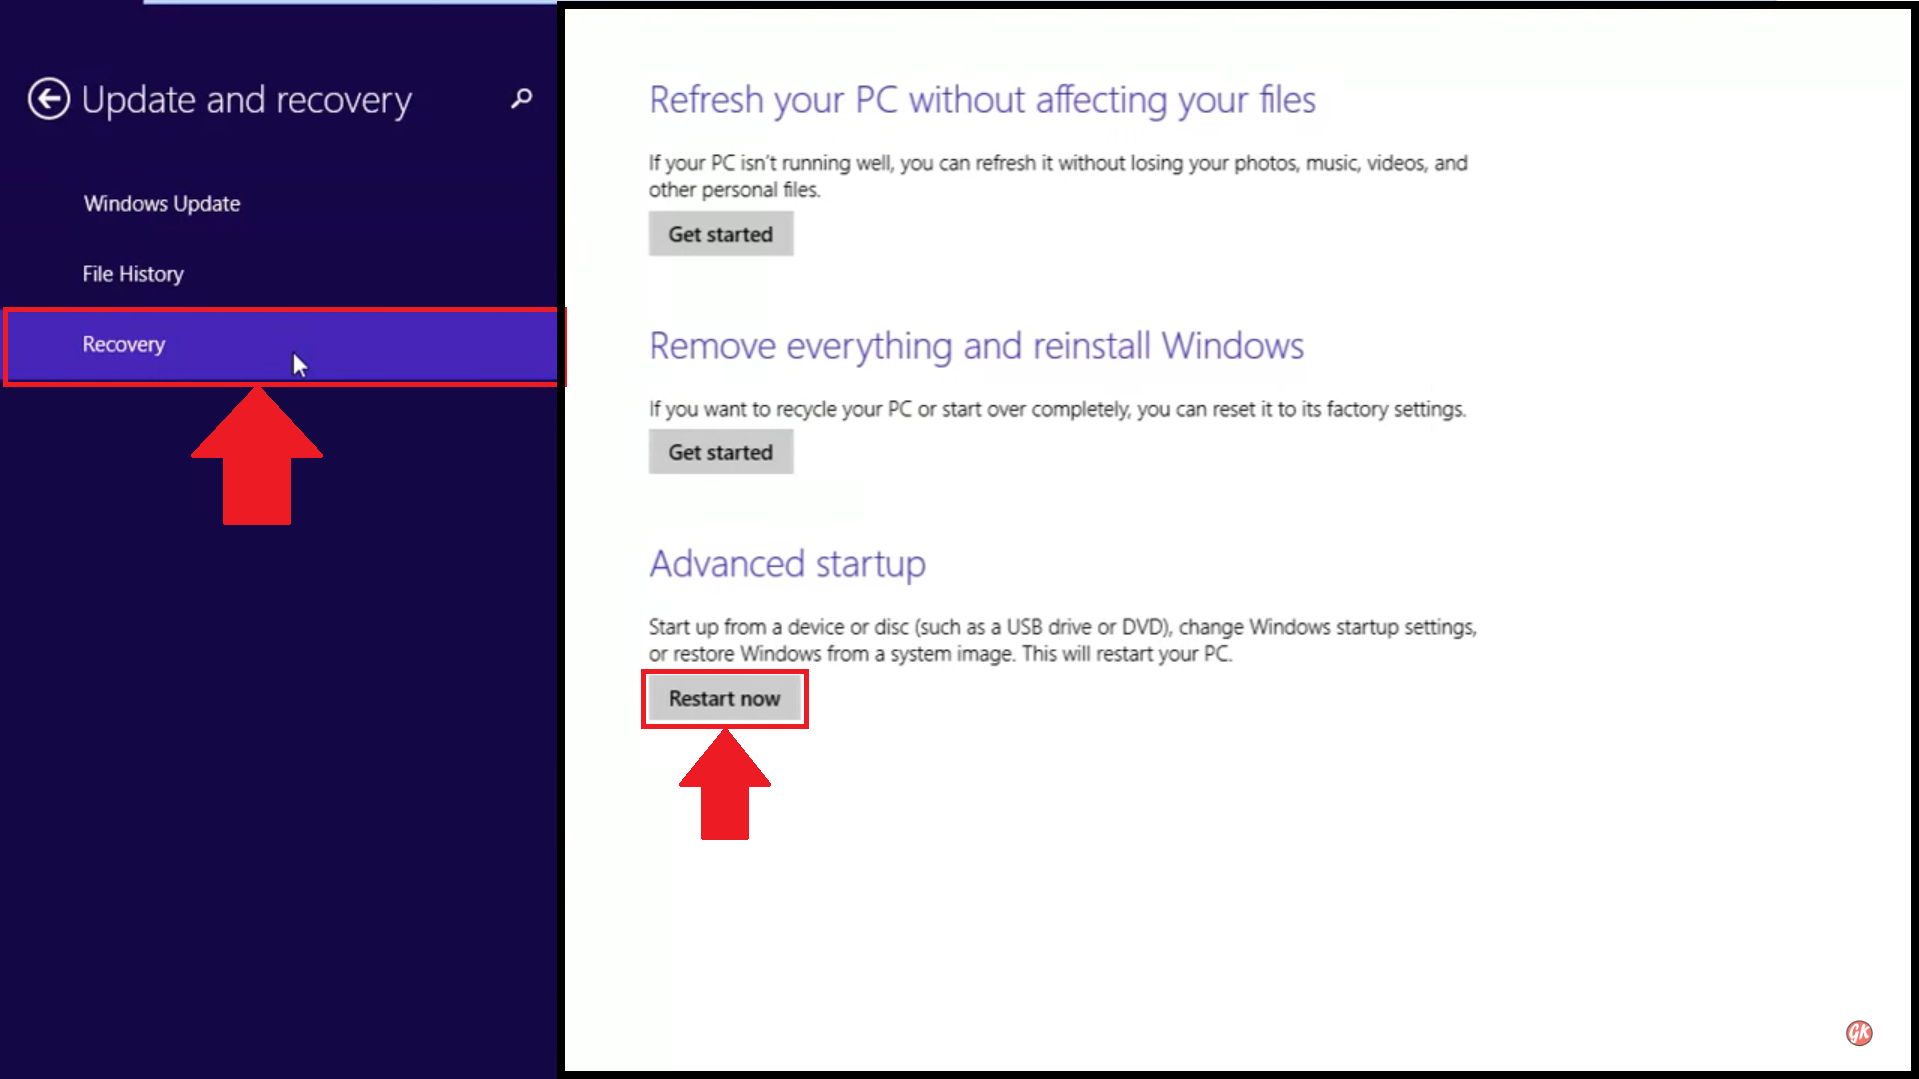
- Next, click on "Recovery" on the left side. You will then be shown a few options. Under "Advanced Startup" click on "Restart now" as shown below.
For the next steps, click here.
Windows 10.
Getting access to BIOS of your machine can be achieved in a few simple steps which are outlined below.
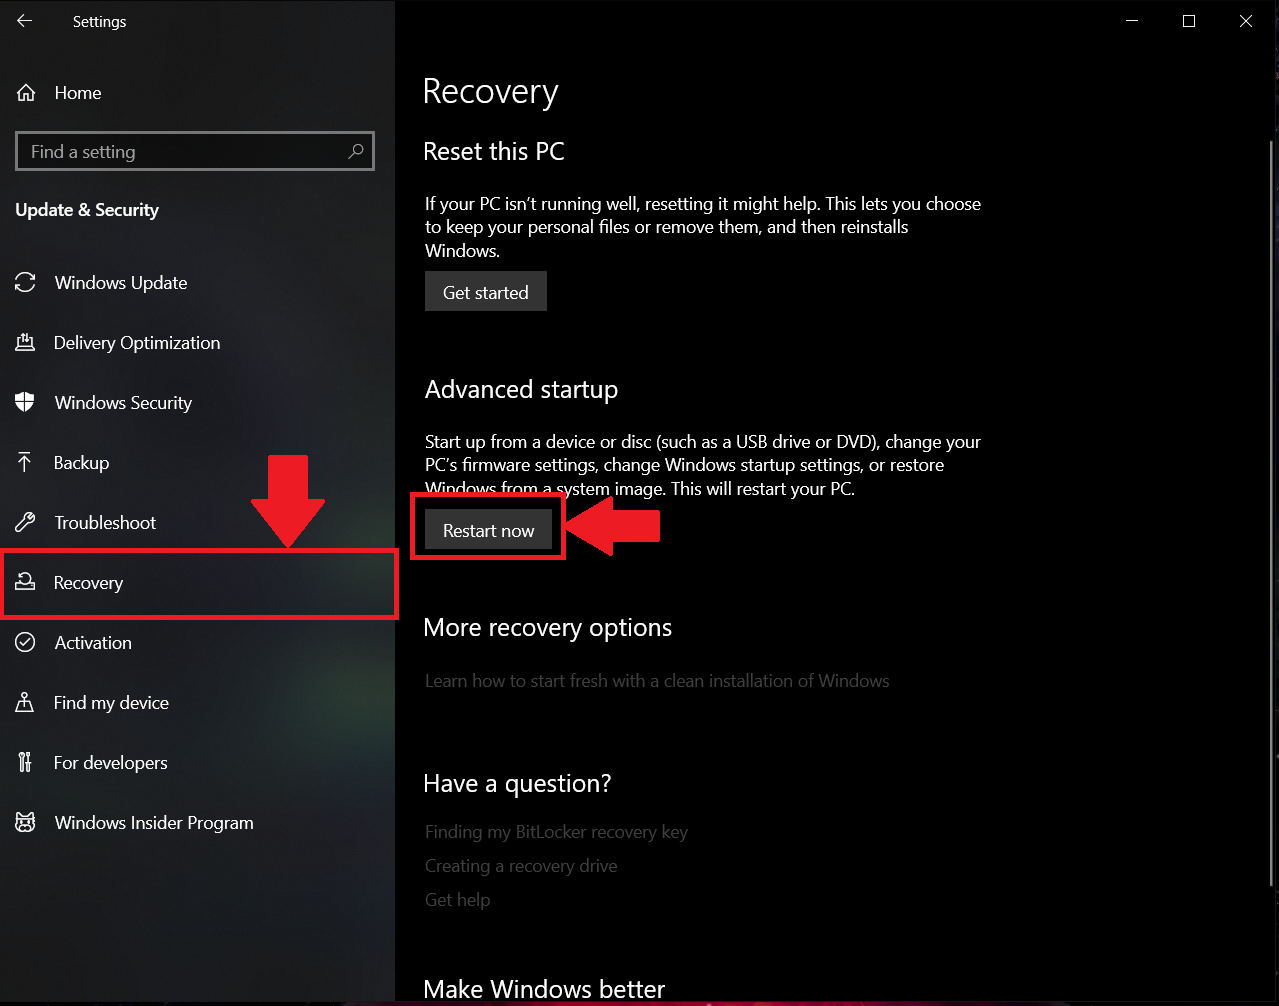
- Go to "Settings" and navigate to "Recovery" on the left side of the menu. Then, click on "Restart now" as shown below.
- After that, you will be presented with 4 options. Choose "Troubleshoot".

- Next, choose "Advanced Options"

- After that, select "UEFI Firmware Settings". If you do not come across this option, click here for an alternate way to access your BIOS.

- You will then be prompted to restart your machine. Click on "Restart Now".

- To change BIOS settings for Intel users, click here.
- To change BIOS settings for AMD users, click here.
Some versions of Windows do not have the above steps to enter BIOS. In case this occurs for your PC/Laptop, please refer to the documentation accompanying your PC/Laptop for the correct steps.
Alternatively, there are a few steps to enter your BIOS which are illustrated below with an example.
HP
- While your PC is restarting, repeatedly tap ESC key to enter BIOS.
- Press the F10 key for BIOS Setup.
- Press the right arrow key to System Configuration tab, Select Virtualization Technology and then press the Enter key.
Dell
- Press F2 key at startup BIOS Setup.
- Press the right arrow key to the Advanced tab, Select Virtualization and then press the Enter key.
- Select Enabled and press the Enter key.
- Press the F10 key and select Yes and press the Enter key to save changes and Reboot into Windows.
Asus
- Press F2 key at startup BIOS Setup.
- Press the right arrow key to the Advanced tab, Select Virtualization Technology and then press the Enter key.
- Select Enabled and press the Enter key.
- Press the F10 key and select Yes and press the Enter key to save changes and Reboot into Windows.
Acer
- Press F2 key at startup BIOS Setup.
- Press the right arrow key to System Configuration tab, Select Virtualization Technology and then press the Enter key.
- Select Enabled and press the Enter key.
- Press the F10 key and select Yes and press the Enter key to save changes and Reboot into Windows.
Lenovo
- During startup, press or tap F1 key to enter BIOS.
- Navigate to the "Security" tab and press "Enter" on "Virtualization".
- Select "Intel(R) Virtualization Technology". Press "Enter" and click on "Enable".
- Press "F10".
- Remember to save the changes before starting Windows again.
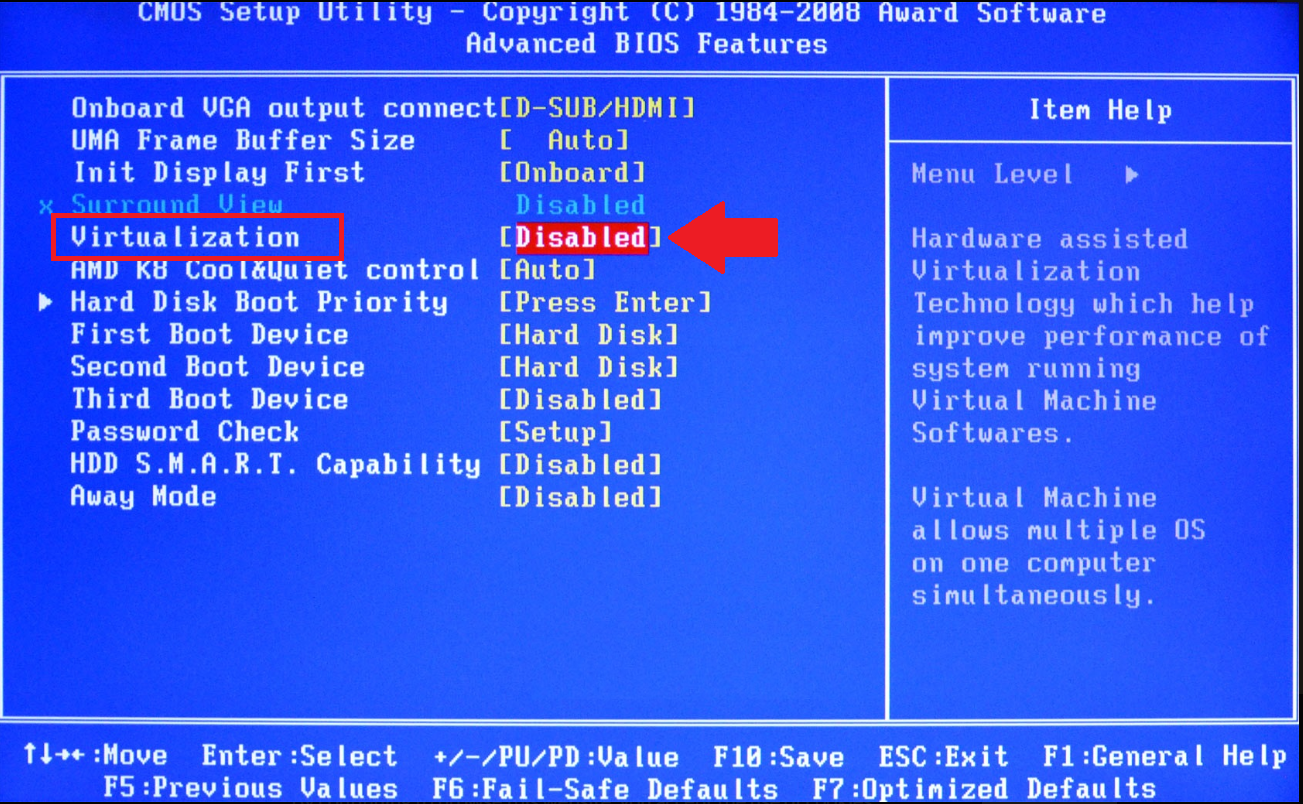
How to enable virtualization in BIOS.
On restarting you will be redirected to your BIOS Settings. The layout of BIOS Settings depends on various factors e.g your motherboard, processor type, chipset and OEM. Please refer to the documentation given with your PC/Laptop for steps to enter BIOS. For representation purposes, we have used ASUS laptops running on Intel and AMD chips respectively.
Intel Users
Step 1 - Enter "Advanced Mode". You can either click on it or press F7 on your keyboard.
Step 2 - In Advanced Mode, shift to Advanced tab.
Step 3 - In Advanced tab, you will be presented with various options. Select CPU Configuration.
Step 4 - Under CPU Configuration, scroll down to "Intel Virtualization Technology". If it is disabled, you can enable it by clicking on "Disabled" and changing it to "Enabled".
Step 5 - Once it is enabled, you can now exit BIOS Settings. Word of caution, while exiting make sure to select "Save changes and reset.". The wording might vary in different scenarios depending on your PC model but the general gist is to save before exiting.
AMD Users
Step 1 - Enter "Advanced Mode". You can either click on it or press F7 on your keyboard.
Step 2 - In Advanced Mode, shift to Advanced tab.
Step 3 - Here you will be presented with various options. Select CPU Configuration.
Step 4 - Under "CPU Configuration", scroll down to "SVM Mode". If it is disabled, you can enable it by clicking on "Disabled" and selecting "Enabled".
Step 5 - Once these changes have been implemented, click on "Exit" as shown below.
Step 6 - You will then be asked whether or not to save these changes. Click on "Ok". Virtualization will then be enabled on your PC/Laptop. You should then be able to use BlueStacks without any issues,
We genuinely appreciate your choosing BlueStacks. We hope you enjoy using it. If you have any further questions, please contact us at support at bluestacks dot com. Thank you very much.
Last updated on 16 December 2019
 Personal Information